
Dies ist eine alte Version des Dokuments!
Inhaltsverzeichnis
Installation Odoo13 auf CentOS8

![]()
In this tutorial, we will learn how to install and configure Odoo 13 with Nginx as a reverse proxy on CentOS 8 server with IPV4 and IPV6.
Requirements
- A Server running CentOS 8 with minimum 2 GB of RAM.
- A valid domain name pointed to your server IP. In this tutorial, we will use exmaple.com domain..
- A root password is configured on the server.
Getting Started
First, update the system and install EPEL repository with the following command:
dnf update
dnf install epel-release
Next, you will need to install some tools and dependencies needed to build the Odoo on your system. You can install all of them with the following command:
dnf install python36 python36-devel git gcc wget nodejs libxslt-devel bzip2-devel openldap-devel libjpeg-devel freetype-devel
Once all the packages are installed, you can proceed to the next step.
Create Odoo User
Next, you will need to create a new system user with name odoo and home directory /opt/odoo using the following command:
useradd -m -U -r -d /opt/odoo -s /bin/bash odoo
Install and Configure PostgreSQL
Odoo uses PostgreSQL to store their data. So you will need to install PostgreSQL on your server. You can install it with the following command:
dnf install postgresql postgresql-server postgresql-contrib
Once installed, initialize the database with the following command:
/usr/bin/postgresql-setup initdb
You should get the following output:
* Initializing database in '/var/lib/pgsql/data'
* Initialized, logs are in /var/lib/pgsql/initdb_postgresql.log
Next, start the PostgreSQL service and enable it to start after system reboot with the following command:
systemctl start postgresql && systemctl enable postgresql && systemctl status postgresql
Next, you will need to create a new PostgreSQL user with the same name as system user as shown below:
su - postgres -c "createuser -s odoo"
Install Wkhtmltopdf
Next, you will need to install wkhtmltopdf tool in your system so that Odoo can print PDF reports. You can install it with the following command:
wget https://downloads.wkhtmltopdf.org/0.12/0.12.5/wkhtmltox-0.12.5-1.centos7.x86_64.rpm
dnf localinstall wkhtmltox-0.12.5-1.centos7.x86_64.rpm
Install and Configure Odoo 13
First, switch to the Odoo user with the following command:
su - odoo
Next, download the latest version of the Odoo 13 from the Git repository using the git command:
git clone https://www.github.com/odoo/odoo --depth 1 --branch 13.0 /opt/odoo/odoo13
Next, create a new virtual environment for Odoo 13 instance with the following command:
cd /opt/odoo && python3 -m venv odoo13-venv
Next, activate the virtual environment with the following command:
source odoo13-venv/bin/activate
You should get the following output:
(odoo13-venv) [odoo@centos8 ~]$
Next, install all the required Python modules for Odoo 13 with the following command:
pip3 install -r odoo13/requirements.txt
Once all the required modules are installed, deactivate the virtual environment and exit from the Odoo user with the following command:
deactivate
exit
Next, create a new directory to store the Odoo custom modules and Odoo logs:
mkdir /opt/odoo/odoo13-custom-addons && mkdir /var/log/odoo13 && touch /var/log/odoo13/odoo.log
Next, change the ownership of both directory to the odoo user with the following command:
chown -R odoo:odoo /opt/odoo/odoo13-custom-addons && chown -R odoo:odoo /var/log/odoo13/
Next, create a new configuration file for Odoo 13 using the following command:
nano /etc/odoo.conf
Add the following lines:
[options]
admin_passwd = admin@123
db_host = False
db_port = False
db_user = odoo
db_password = False
xmlrpc_port = 8069
http_interface = ::
logfile = /var/log/odoo13/odoo.log
logrotate = True
addons_path = /opt/odoo/odoo13/addons,/opt/odoo/odoo13-custom-addons
Create a Systemd Service file for Odoo 13
Next, you will need to create a new systemd unit file for Odoo 13 to manage the Odoo service. You can create it with the following command:
nano /etc/systemd/system/odoo13.service
Add the following lines:
[Unit]
Description=Odoo13
#Requires=postgresql-10.6.service
#After=network.target postgresql-10.6.service
[Service]
Type=simple
SyslogIdentifier=odoo13
PermissionsStartOnly=true
User=odoo
Group=odoo
ExecStart=/opt/odoo/odoo13-venv/bin/python3-c /etc/odoo.conf
StandardOutput=journal+console
[Install]
WantedBy=multi-user.target
Save and close the file. Then, reload the systemd daemon, start Odoo, enable it at autostart and see the status with the following command:
systemctl daemon-reload && systemctl start odoo13 && systemctl enable odoo13 && systemctl status odoo13
You should get the following output:
● odoo13.service - Odoo13
   Loaded: loaded (/etc/systemd/system/odoo13.service; enabled; vendor preset: disabled)
   Active: active (running) since Fri 2020-01-31 23:47:50 CET; 1 day 12h ago
 Main PID: 952 (python3)
    Tasks: 6 (limit: 24843)
   Memory: 378.0M
   CGroup: /system.slice/odoo13.service
           └─952 /opt/odoo/odoo13-venv/bin/python3 /opt/odoo/odoo13/odoo-bin -c /etc/odoo.conf
By default, Odoo listens on port 8069. You can check it with the following command:
netstat -plntu | grep 8069
You should see the following output:
tcp 0 0 0.0.0.0:8069 0.0.0.0:* LISTEN 952/python3
Configure Nginx as a Reverse Proxy for Odoo 13
Next, you will need to install and configure the Nginx as a reverse proxy for Odoo 13 instance. First, install the Nginx web server with the following command:
dnf install nginx
Once installed, create a new virtual host configuration file with the following command:
nano /etc/nginx/conf.d/odoo13.conf
upstream odoo {
 server 127.0.0.1:8069;
}
server {
    listen 80;
    server_name example.com;

    access_log /var/log/nginx/odoo13.access.log;
    error_log /var/log/nginx/odoo13.error.log;

        location / {
        proxy_set_header X-Forwarded-Host $host;
        proxy_set_header X-Forwarded-For $proxy_add_x_forwarded_for;
        proxy_set_header X-Forwarded-Proto $scheme;
        proxy_set_header X-Real-IP $remote_addr;


        proxy_redirect off;
        proxy_pass http://odoo;
    }

location ~* /web/static/ {
        proxy_cache_valid 200 90m;
        proxy_buffering on;
        expires 864000;
        proxy_pass http://odoo;
    }

    gzip_types text/css text/less text/plain text/xml application/xml application/json application/javascript;
    gzip on;
}
Save and close the file when you are finished. Then, start the Nginx service and enable it to start after system reboot with the following command:
systemctl start nginx && systemctl enable nginx && systemctl status nginx
You should see the following output:
● nginx.service - The nginx HTTP and reverse proxy server
   Loaded: loaded (/usr/lib/systemd/system/nginx.service; enabled; vendor preset: disabled)
   Active: active (running) since Fri 2020-01-31 23:47:51 CET; 1 day 12h ago
  Process: 998 ExecStart=/usr/sbin/nginx (code=exited, status=0/SUCCESS)
  Process: 987 ExecStartPre=/usr/sbin/nginx -t (code=exited, status=0/SUCCESS)
  Process: 969 ExecStartPre=/usr/bin/rm -f /run/nginx.pid (code=exited, status=0/SUCCESS)
 Main PID: 1007 (nginx)
    Tasks: 9 (limit: 24843)
   Memory: 22.9M
   CGroup: /system.slice/nginx.service
           ├─1007 nginx: master process /usr/sbin/nginx
           ├─1008 nginx: worker process
           ├─1009 nginx: worker process
           ├─1010 nginx: worker process
           ├─1011 nginx: worker process
           ├─1012 nginx: worker process
           ├─1013 nginx: worker process
           ├─1014 nginx: worker process
           └─1015 nginx: worker process

Jän 31 23:47:51 erp systemd[1]: Starting The nginx HTTP and reverse proxy server...
Jän 31 23:47:51 erp nginx[987]: nginx: the configuration file /etc/nginx/nginx.conf syntax is ok
Jän 31 23:47:51 erp nginx[987]: nginx: configuration file /etc/nginx/nginx.conf test is successful
Jän 31 23:47:51 erp systemd[1]: Started The nginx HTTP and reverse proxy server.
Configure Firewall
If you are behind a real firewall, it is a good idea to disable the firewall completly.
systemctl stop firewalld && systemctl disable firewalld && systemctl mask --now firewalld && firewall-cmd --state
By default, SELinux is enabled in CentOS 8. So you will need to allow HTTP through SELinux. You can allow it with the following command:
setsebool -P httpd_can_network_connect on
Access Odoo 13 Web Interface
Now, Odoo 13 is installed and configured. It's time to access the Odoo 13 web interface. Open your web browser and type the URL http://example.com. You will be redirected to the following page:
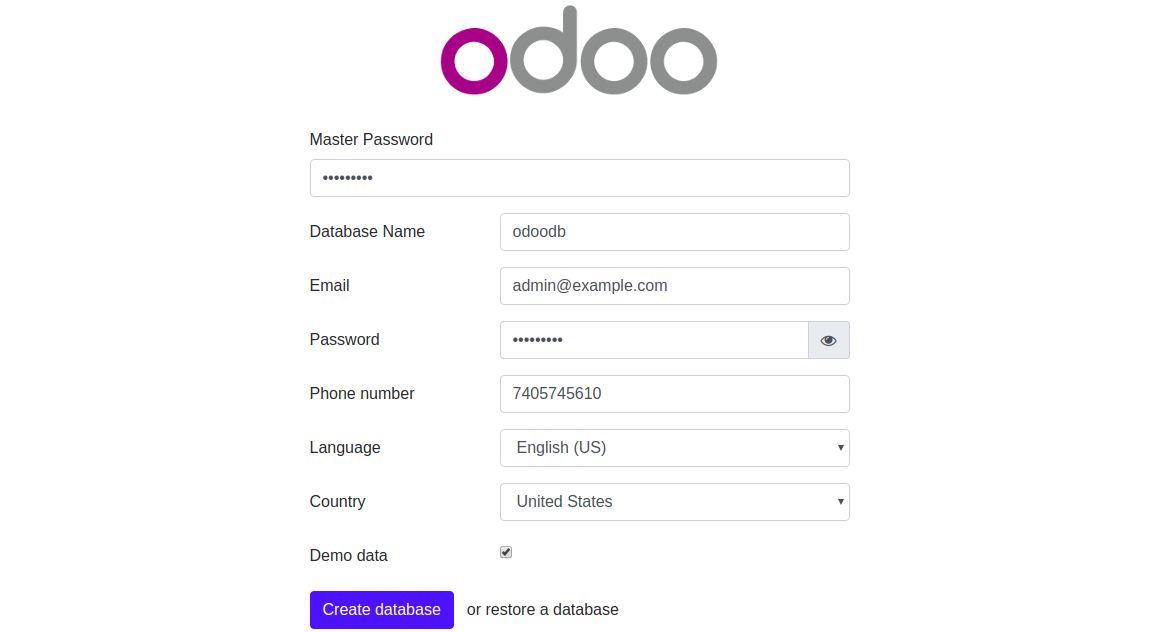
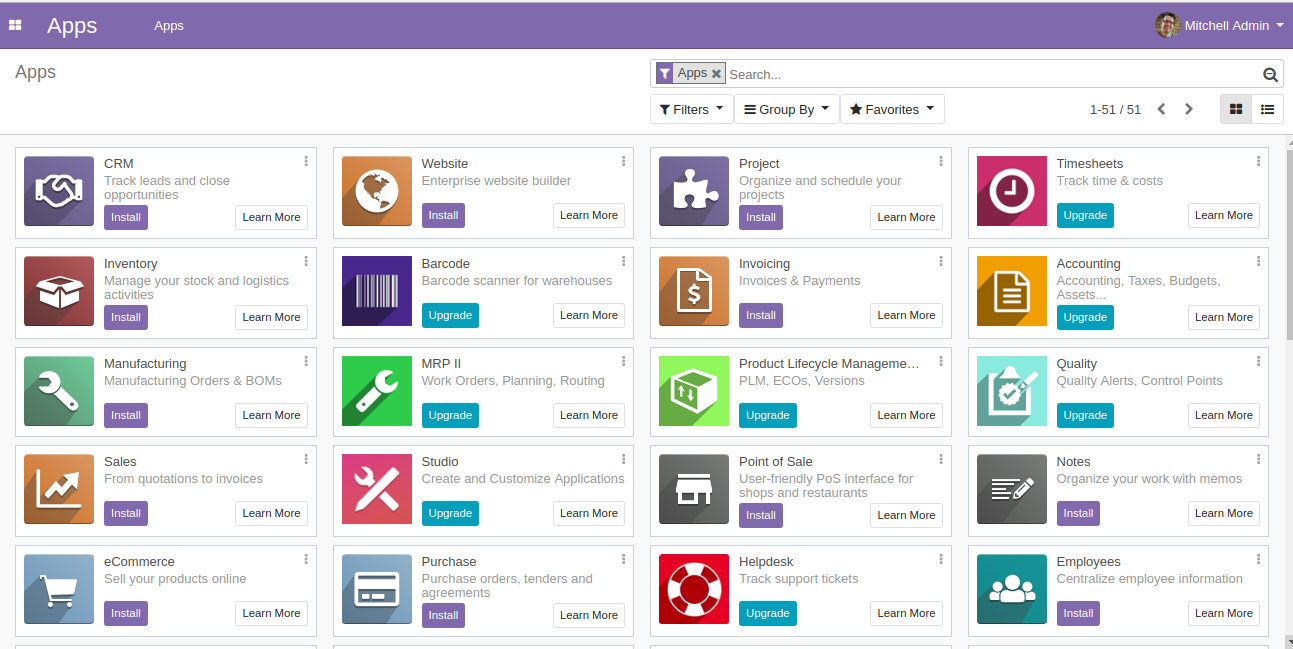
Now, provide your Master Password, Database name, Email, Password, Country and click on the Create database button. You will be redirected to the Odoo 13 Administration page:
In the above tutorial, you learned how to install and configure Odoo 13 on CentOS 8 server. You also learned how to configure Nginx as a reverse proxy for Odoo 13. You can now customize your Odoo 13 instance as per your business needs.